红萝卜蛋糕是奢侈品,是道适合任何场合的美味点心。有些食谱需要坚果及菠萝来增加口感及水份,但不是必要的。
这种美味的蛋糕有种奶油口感。你试过后,它可能会成为你每月必烤的点心! 阅读以下来了解如何制作胡萝卜蛋糕。
素材
- 6 1/8盎司(180克) 自发面粉(筛过)
- 12 1/2盎司(350克) 白砂糖
- 1 茶匙泡打粉
- 1茶匙 碎肉桂
- 3 个蛋
- 8盎司(220克) 磨碎生红萝卜
- 1/4 茶匙 盐
- 10 1/8 fl盎司(300克) 葵花籽油
糖霜
- 6 1/8盎司(180克)奶油奶酪
- 6 1/8盎司(180克) 溶化牛油
- 8盎司(220克) 糖粉
- 1/2 茶匙 香草精
- 柳橙香味
步骤
-


{“smallUrl”:”https://www.wikihow.com/images_en/thumb/b/b1/Make-Carrot-Cake-Step-1.jpg/v4-460px-Make-Carrot-Cake-Step-1.jpg”,”bigUrl”:”https://www.wikihow.com/images/thumb/b/b1/Make-Carrot-Cake-Step-1.jpg/v4-728px-Make-Carrot-Cake-Step-1.jpg”,”smallWidth”:460,”smallHeight”:306,”bigWidth”:”728″,”bigHeight”:”485″,”licensing”:”<div class=”mw-parser-output”></div>”}
预热烤箱 350º 华氏 (180º C /焦痕4) 。
-
{“smallUrl”:”https://www.wikihow.com/images_en/thumb/e/e9/Make-Carrot-Cake-Step-2.jpg/v4-460px-Make-Carrot-Cake-Step-2.jpg”,”bigUrl”:”https://www.wikihow.com/images/thumb/e/e9/Make-Carrot-Cake-Step-2.jpg/v4-728px-Make-Carrot-Cake-Step-2.jpg”,”smallWidth”:460,”smallHeight”:306,”bigWidth”:”728″,”bigHeight”:”485″,”licensing”:”<div class=”mw-parser-output”></div>”}
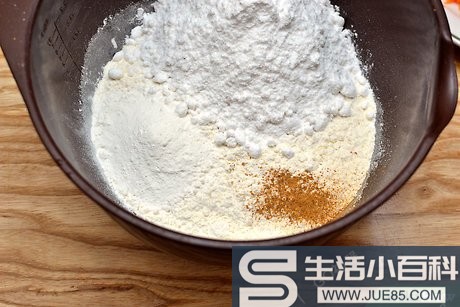
在大碗中混合干燥食材。 加入面粉、糖、泡打粉、盐及肉桂 。
-
{“smallUrl”:”https://www.wikihow.com/images_en/thumb/f/fe/Make-Carrot-Cake-Step-3.jpg/v4-460px-Make-Carrot-Cake-Step-3.jpg”,”bigUrl”:”https://www.wikihow.com/images/thumb/f/fe/Make-Carrot-Cake-Step-3.jpg/v4-728px-Make-Carrot-Cake-Step-3.jpg”,”smallWidth”:460,”smallHeight”:306,”bigWidth”:”728″,”bigHeight”:”485″,”licensing”:”<div class=”mw-parser-output”></div>”}
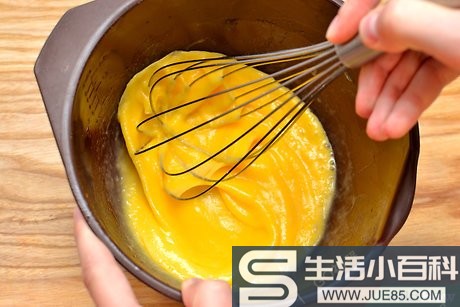
混合湿食材在另个碗中。混合蛋、油及香草直到有滑顺口感。
-
{“smallUrl”:”https://www.wikihow.com/images_en/thumb/f/fa/Make-Carrot-Cake-Step-4.jpg/v4-460px-Make-Carrot-Cake-Step-4.jpg”,”bigUrl”:”https://www.wikihow.com/images/thumb/f/fa/Make-Carrot-Cake-Step-4.jpg/v4-728px-Make-Carrot-Cake-Step-4.jpg”,”smallWidth”:460,”smallHeight”:306,”bigWidth”:”728″,”bigHeight”:”485″,”licensing”:”<div class=”mw-parser-output”></div>”}
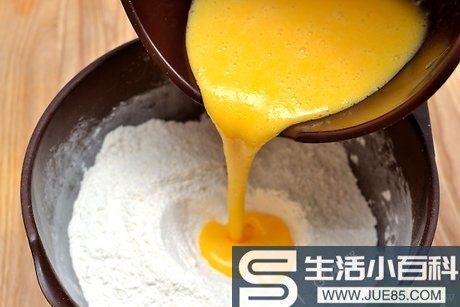
将蛋混合体和面粉倒入碗中。
-
{“smallUrl”:”https://www.wikihow.com/images_en/thumb/e/ed/Make-Carrot-Cake-Step-5.jpg/v4-460px-Make-Carrot-Cake-Step-5.jpg”,”bigUrl”:”https://www.wikihow.com/images/thumb/e/ed/Make-Carrot-Cake-Step-5.jpg/v4-728px-Make-Carrot-Cake-Step-5.jpg”,”smallWidth”:460,”smallHeight”:306,”bigWidth”:”728″,”bigHeight”:”485″,”licensing”:”<div class=”mw-parser-output”></div>”}
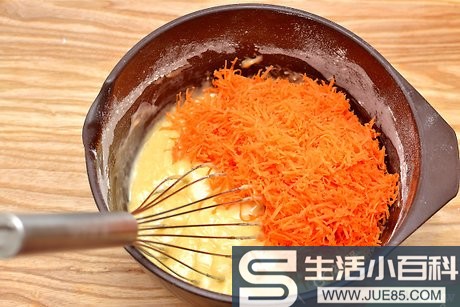
加入磨碎生红萝卜并搅拌。小心不要搅过头 。搅过头会拉长面筋,做出的蛋糕会较硬而不轻及脆。
-
{“smallUrl”:”https://www.wikihow.com/images_en/thumb/2/28/Make-Carrot-Cake-Step-6.jpg/v4-460px-Make-Carrot-Cake-Step-6.jpg”,”bigUrl”:”https://www.wikihow.com/images/thumb/2/28/Make-Carrot-Cake-Step-6.jpg/v4-728px-Make-Carrot-Cake-Step-6.jpg”,”smallWidth”:460,”smallHeight”:306,”bigWidth”:”728″,”bigHeight”:”485″,”licensing”:”<div class=”mw-parser-output”></div>”}
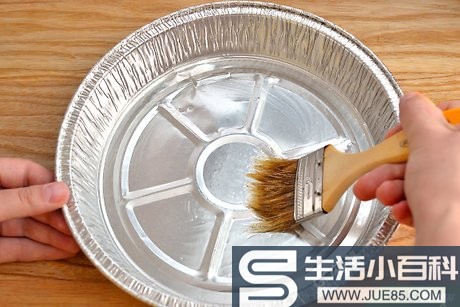
使用糕点刷将模具刷上溶化牛由。在锅底及周围放些面粉。
-
{“smallUrl”:”https://www.wikihow.com/images_en/thumb/5/55/Make-Carrot-Cake-Step-7.jpg/v4-460px-Make-Carrot-Cake-Step-7.jpg”,”bigUrl”:”https://www.wikihow.com/images/thumb/5/55/Make-Carrot-Cake-Step-7.jpg/v4-728px-Make-Carrot-Cake-Step-7.jpg”,”smallWidth”:460,”smallHeight”:306,”bigWidth”:”728″,”bigHeight”:”485″,”licensing”:”<div class=”mw-parser-output”></div>”}
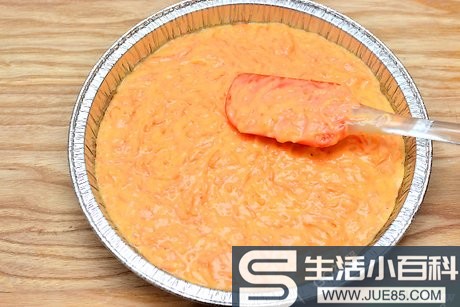
将面糊倒入。确定面糊均匀地分散在整个锅内。
-
{“smallUrl”:”https://www.wikihow.com/images_en/thumb/d/de/Make-Carrot-Cake-Step-8.jpg/v4-460px-Make-Carrot-Cake-Step-8.jpg”,”bigUrl”:”https://www.wikihow.com/images/thumb/d/de/Make-Carrot-Cake-Step-8.jpg/v4-728px-Make-Carrot-Cake-Step-8.jpg”,”smallWidth”:460,”smallHeight”:306,”bigWidth”:”728″,”bigHeight”:”485″,”licensing”:”<div class=”mw-parser-output”></div>”}
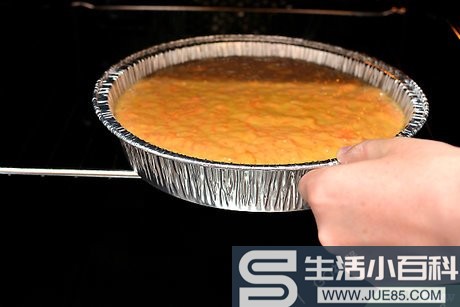
将模具放在烤箱中央并烤35-40 分钟。
-

{“smallUrl”:”https://www.wikihow.com/images_en/thumb/3/32/Make-Carrot-Cake-Step-9.jpg/v4-460px-Make-Carrot-Cake-Step-9.jpg”,”bigUrl”:”https://www.wikihow.com/images/thumb/3/32/Make-Carrot-Cake-Step-9.jpg/v4-728px-Make-Carrot-Cake-Step-9.jpg”,”smallWidth”:460,”smallHeight”:306,”bigWidth”:”728″,”bigHeight”:”485″,”licensing”:”<div class=”mw-parser-output”></div>”}
用牙签测试。35分钟后插入牙签再拿出来。若牙签是干的,蛋糕就好了。若牙签沾有面糊,就需要再烤久点。
-
{“smallUrl”:”https://www.wikihow.com/images_en/thumb/9/9b/Make-Carrot-Cake-Step-10.jpg/v4-460px-Make-Carrot-Cake-Step-10.jpg”,”bigUrl”:”https://www.wikihow.com/images/thumb/9/9b/Make-Carrot-Cake-Step-10.jpg/v4-728px-Make-Carrot-Cake-Step-10.jpg”,”smallWidth”:460,”smallHeight”:306,”bigWidth”:”728″,”bigHeight”:”485″,”licensing”:”<div class=”mw-parser-output”></div>”}
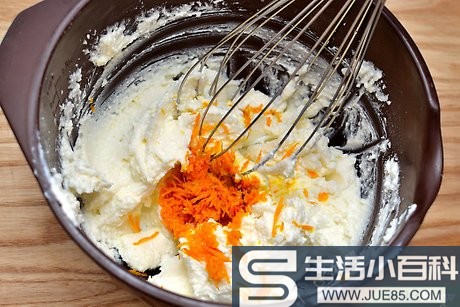
当蛋糕凉后再制作糖粉。用电动搅拌器或用手搅拌:
- 糖、奶油奶酪及溶化牛油
- 加入柳橙香味
- 混合直到变滑顺
-
{“smallUrl”:”https://www.wikihow.com/images_en/thumb/f/f0/Make-Carrot-Cake-Step-11.jpg/v4-460px-Make-Carrot-Cake-Step-11.jpg”,”bigUrl”:”https://www.wikihow.com/images/thumb/f/f0/Make-Carrot-Cake-Step-11.jpg/v4-728px-Make-Carrot-Cake-Step-11.jpg”,”smallWidth”:460,”smallHeight”:306,”bigWidth”:”728″,”bigHeight”:”485″,”licensing”:”<div class=”mw-parser-output”></div>”}
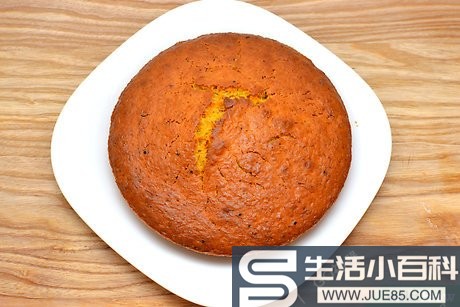
呈盘。你可用饼架或大盘子。
-
{“smallUrl”:”https://www.wikihow.com/images_en/thumb/5/53/Make-Carrot-Cake-Step-12.jpg/v4-460px-Make-Carrot-Cake-Step-12.jpg”,”bigUrl”:”https://www.wikihow.com/images/thumb/5/53/Make-Carrot-Cake-Step-12.jpg/v4-728px-Make-Carrot-Cake-Step-12.jpg”,”smallWidth”:460,”smallHeight”:306,”bigWidth”:”728″,”bigHeight”:”485″,”licensing”:”<div class=”mw-parser-output”></div>”}
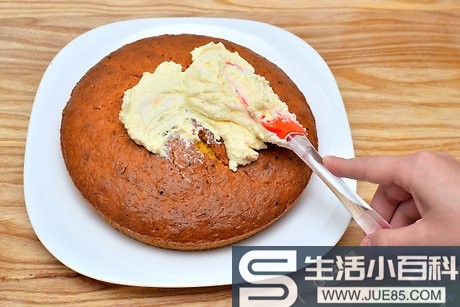
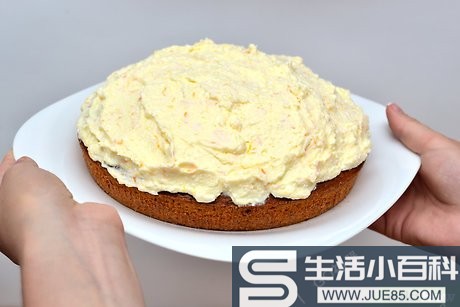
将糖霜涂在蛋糕上。 使用抹刀均匀地将糖霜涂在蛋糕上。 让糖霜变硬。
-
{“smallUrl”:”https://www.wikihow.com/images_en/thumb/7/77/Make-Carrot-Cake-Step-13.jpg/v4-460px-Make-Carrot-Cake-Step-13.jpg”,”bigUrl”:”https://www.wikihow.com/images/thumb/7/77/Make-Carrot-Cake-Step-13.jpg/v4-728px-Make-Carrot-Cake-Step-13.jpg”,”smallWidth”:460,”smallHeight”:306,”bigWidth”:”728″,”bigHeight”:”485″,”licensing”:”<div class=”mw-parser-output”></div>”}
准备食用!
小提示
- 想让蛋糕甜点可在烤前加些菠萝。
- 你可加些可爱的小红萝卜在上面;你可在所有不错的蛋糕装饰店买到。
- 在涂糖霜前在上面加些糖粉。然后趁蛋糕还热时放进冰箱。
- 你可用任何尖的东西代替牙签。
你需准备
- 1只糕点刷
- 3 个大碗
- 1个汤匙
- 1个抹刀
- 1只搅拌器
- 20公分直径模具
- 1枝牙签
警告:生活小百科登载此文出于传递更多信息之目的,文章内容仅供参考,并不意味着赞同其观点或证实其描述。

 微信扫一扫
微信扫一扫